Thursday, August 13, 2009

Arpeggiator Fun - Part II - Tension Build Up

Here's a cool way to make a musical build up using an arpeggiator trick.
Create a cool build-up in your musical climaxes with yet another powerful (and simpe) tool.

(this is my first tutorial on demand,built for artois from the ableton tips and tricks forum . may there be many more!)

Lets get started!


Grab any lead VST instrument and create a four bar chord (I used a C major chord). Make sure it's a long sustaining chord and not four bars of repeating notes.

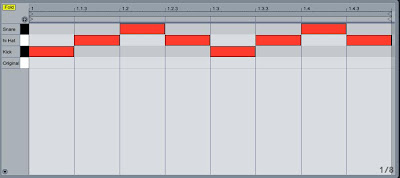
Put an arrpegiator before it. I also threw in an EQ eight for a sweeping low-pass filter:


In the arrpegiator:

*set the style on random

* set the rate to 1/8

* set the gate on 120%

basically we are asking our arrpegiator to take all the notes and play one of them at random every 8th note. the length of each note will be UP TO 120% of an 8th note (you'll see what I mean a bit later)


In the EQ eight:

*cancel all the poles leaving just one

* set it to low pass

* set it's frequency to the maximum (22KHZ)


We're telling our EQ eight not to let any frequencies over a MAX of 22KHZ pass.


now we'll put a 4 bar linear automation on the gate parameter of the arrpegiator and the frequency parameter of the eq eight:


press play and listen to four bars of ultimate climax :)


Wanna contribute a cool tip?
email me : fireballgames AT hotmail DOT com
Feel like being a good sport?
Add me as a friend on myspace!
Cheers
J

Wednesday, August 12, 2009

Musical Mutes - using midi jedi tricks

Hi there,
Today we're going to make muting more musical. When I use the channel mute button I get two very annoying side effects:

* long sustaining drum sounds get cut abruptly

* when returning from mute , long sustaining notes suddenly play (only their tail)

So how do we do a musical mute, basically telling a single drum part of the kit to stop and start playing?


Lets get started!


first create a drum rack.

Then drag a sample into the drum rack , I used Freddie the Freeloader by Miles and captured a horn hit.

next drag a "note length" midi effect before the simpler:


set the mode to SYNC and the time to zero.
now press ctrl-k and map the "q" button to the device on/off.
make a short midi clip with long and short notes and start pressing the "q" button once in a while to feel just how cool this tip I gave you is ;-)
p.s. I mapped the on/off button to an on/off button on my BCR2000, So this trick is cool for midi controllers as well.

Wanna contribute a cool tip?
email me : fireballgames AT hotmail DOT com
Feel like being a good sport?
Add me as a friend on myspace!
Cheers
J

Monday, July 20, 2009

Follow Action Fun - creating new experimental beats.

Hi There,
Today we're going to explore the Follow actions in Live and see how we can create new "random" beats we didn't have know were possible :)

Our plan is to create four 1-bar drum beats and mix them around randomly.

Lets get started!

For this demo I'll use the drum set from "Drum Rack Fun" - a simple 3 piece set:kick/hi hat/snare.

I'll create four really basic loops:


Now select all four clips at once , press the L circle to access follow action menu:

  • set them to Legato mode (meaning they wont start from the beginning each launch)
  • set the follow action time to 0-1-0 (1 quarter note)
  • set the left follow action (the one that always happens on a 1-0 ratio) to "any"

Now press play... Cool isn't it?

You just created a cool breakbeat without even sweating...

Now let's really go crazy:

Create three clips in a group (next to each other in the channel). Each clip should be filled with 1/16th notes of a single drum (1 full of 16th notes kicks,1 full of snares and one full of hi hats)

Sounds pretty stupid, huh?

not really:

Now select all three:

  • set them on legato mode
  • set the follow action time to 0-0-1 (1 sixteenth note)
  • set the left follow action (the one that always happens on a 1-0 ratio) to "any"

Auto breakbeat!

now put a pad and a bass line over that and you're spent!

Wanna contribute a cool tip?
email me : fireballgames AT hotmail DOT com
Feel like being a good sport?
Add me as a friend on myspace!
Cheers
J

Thursday, July 2, 2009

Drum Rack Fun - Wave manipulation gallore!

Hi There,


Today we're going to explore how far you can go with wave manipulations using the cool drum rack. We're going to take a single sample and create a whole drum kit out of it. The drum kit will also be completely dynamic, constantly changing.


It's gonna be so cool! I just can't wait!


Lets get started!


First off lets create a sample to manipulate: Lets drag an operator into a midi channel. Next we'll choose the noise waveform to get a rich harmonic base sample. create a beat in a midi loop and freeze it.

Next drag the frozen clip into an audio channel and voila! you got an audio sample of the operator beat. Now lets drag a drum rack into a new midi channel. Open up the device and you'll see 16 slots for drum sounds. Drag the frozen sample into C1. For convinience rename it to Original.

Now copy the sample into C#1 and rename that slot "Kick". Double click the slot and check out the whole control panel that appears. Let's turn this noisy wave into a punchy kick:
  • To get a sharp attack and no resonance, lets set the ADSR (Attack/Decay/Sustain.Release) envelope to A:0 ms D: 200 ms S: -inf R:1.
  • transpose it down -48 st to give it a bassy sound. now it sounds more like a hammer than a bass :) let's add some EQ
  • Take an EQ eight and leave only one high cut filter on a freq of about 250 hz and Q of about 0.8. Now we have a dull bass kick.
  • Let's spice it up a bit with a Saturator, The "mid range Phattener" preset will do just fine!

now let her rip! This kick is wicked! can't believe it used to be a noise sample...

another cool thing to notice is that we can chain as many devices as we want to any specific patch.

ok, let's make a hi hat:

copy the "Kick" sample into D1 and rename that slot "hi hat". Double click the slot:

  • Remove the Saturator and the EQ.
  • Set the Transposition up to +24 st
  • Now take the attack up to 15 ms and the decay up to 300 ms. sounds pretty good all ready.
  • Let's give the hi hat a "random" feel with an LFO: Turn on the filter and the LFO. Set the filter Freq on 14khz with and LFO input to 5. Now put the LFO on a random wave form, set the frequency on a hi value (I used 8 bars) and put the Retrig switch on.

Now you have a cute,crisp hi hat with a slightly changing feel each hit.

Let's keep going and make a snare:

copy the "Kick" sample into D#1 and rename that slot "Snare". Double click the slot:

  • Remove the Saturator and the EQ.
  • Set Tranposition at 0
  • set the Decay to 400 to get a bit of resonance. This already is a half-way decent snare but let's make it a bit more interesting.
  • Add a Reverb -> singing can into the chain. set the decay time to 1 second and the dry/wet to 10%.

Now that's a nice snare!

So basically , with a noise wave form which had absolutely no character at all , we made a 3 piece drum set which sounds pretty cool.

Next you should try adding all kinds of envelopes to the different parameters we tweaked to get nice sounds out of the set over time.

Have fun :)

Wanna contribute a cool tip?
email me : fireballgames AT hotmail DOT com
Feel like being a good sport?
Add me as a friend on myspace!
Cheers
J

Wednesday, June 24, 2009

Rack/Chain Fun - Crossfading Between Effects

Hi all,
This post talks about a cool feature I needed and found a way to solve.
I wanted a way to cross fade between effects and didn't want to use sends.
I decided to go with racks , since I've already seen cool demos of switching between effects using chains, I decided to try and crossfade between them.

Lets get started!

First of all, let's put a nice pad on the floor playing a I-IV progression. I chose Operator->Synth->Pad->5th Pad and put a 2 bar loop of a C note and an F note:


Now let's drag an Auto Filter after the whole operator chain mess and group it (right click the auto filter bar and press group):


Rename the first chain to "Pulsing" and add another two chains - "Down Step" and "Clean". Drag another auto-Filter into the "Down Step" chain:


What we have now are three different channels to choose from - two effects and one clean one.
Now press solo on the first chain ("pulsing") and create a nice pulsating sound using the frequency settings of the autofilter:


Now solo the second chain ("down step") and create another linear frequency effect. I put the filter on Hi Pass mode with an initial filter of 4.8khz and a Q of 2.26 for a cool resonance effect.


and put on a nice envelope for a down step feeling:


So now we have 3 channels in one, A nice pulsating effect, A cool down step and a clean channel. Let's create three 64 bar,unlinked envelopes on the mixers of each chain: start with a clean effect, move on to the pulsing and finish it off with the down step. Remeber to unsolo the chains and unlink the envelopes:


Now sit back,press play and let the next two minutes sweep over you :)

Wanna contribute a cool tip?
email me : fireballgames AT hotmail DOT com
Feel like being a good sport?
Add me as a friend on myspace!
Cheers
J

Thursday, June 18, 2009

The making of Calliope MK I - DIY in the rough

Here's an off-topic post :D

Ever on the lookout for exercises in futility, I've decided to build my own midi controller for Ableton Live.
What I wanted was a way to trigger loops and sounds without using my laptop. I got some cool ideas snooping around on the internet and decided to build my very own DIY midi controller.

I always find it hard to decide what I want for my birthday. This year the choice was easy, Arcade Buttons!
My Mom and Brother bought me 52 really cool arcade buttons and thus the project began.
I have an old Fatar midi keyboard I never use so I decided to take the plunge. I took it apart and found out how to cause MIDI events

After a million hours of connecting wires and checking that everything works it was time to build the chassis.
I asked my dad for some help here (carpentry not being my forte) and we set to work drilling holes .
Next we put the buttons in

Wiring it all together

And here is the completed project (more pictures and videos coming soon):


Wanna contribute a cool tip?
email me : fireballgames AT hotmail DOT com
Feel like being a good sport?
Add me as a friend on myspace!
Cheers
J

Monday, June 15, 2009

Side-Chain Compression Fun I - disappearing bass drum

In this tutorial I'll teach you the most basic use for a Side-Chain Compressor. This is the reason it was invented.
Ever notice how your bass and kick get all muddy together and you don't get exactly the sound you intended for?
the reason for this is very simple: The kick and the bass are on the same frequencies. They both compete over your attention, The result usually being a musical version of a black eye and hospital bills.
But what if we could teach them to just get along?
The bass has a long sustaining sound. Usually the attack isn't an important part of our bass sound design.
The kick on the other hand is defined by its attack but has no need for a long decay.
That's where side compression comes in: You ask the bass politely to lower (compress) it's volume for a bit every time the kick plays and then raise it back up.
Bingo!
You get a sharp kick for 2-3 ms and then let the bass take over the frequency.


Lets get started!


  • Open a new project in Session View and create two midi channels with operator in them.
  • One channel should have the drums->kick->house kick preset with a "4 on the floor" pattern:


  • The other should have the synth->bass->disco preset with a simple bass line:


  • Now press play on the kick clip. You should here a simple kick 4 times each bar.
  • Now press play on the bass clip. Suddenly the kick disappears every 1st and 4th beat. Told you, didn't I?
  • Let's put a compressor on the bass channel, press the on the compressors title bar to expand the amount of options:


  • Turn on side chain and get your input from the Kick channel :


  • Well , that didn't work. It sounds exactly the same! Lets see why :
  • You've probably noticed by now that the threshold bar is showing the kick track and not the bass track meter. Also you've noticed that the little triangle on the bar is higher than the signal ever reaches. Now start lowering the threshold triangle. You'll notice that the kick really comes out below -35 DB , and not sharp enough , also totally ruining our bass sound.
  • Lets make the cut faster, we want the kick to lower the bass immediatly and then let the bass kick in quickly. We'll set the attack as low as it goes : 0.01 ms and set a fast release at around 5 ms.
  • Now lets set the ratio of the cut much higher. The ratio is the amount of compressing to be done. For instance , if the limit is set to -35 DB and the ratio is 2.0, a -25 DB signal will be reduced to -30 DB (a 2:1 cut on the excesive volume). Since we want to immediatly cut the bass and let it fade in gradually after the kick , lets go for an extremely high ratio 8 ( in the previous example, a -25 DB signal will be cut by 7/8 towards -35DB meaning it will be -33.75 DB)
  • ok, so we have a great sounding kick but the bass sounds really ill. That's because we're cancelling it out too much , there's more room now for the bass. Bring the threshold back up to -20DB and check it out.

We have a wicked sounding kick and a groovy bass. Just for fun, press the bypass button on the compressor and listen to the original mix before the compressor was added and tweaked. The bass sounds a bit punchier now (we gave it back it's attack) and the kick totally disappears on the 1st and 4th beats. Try playing around with the different knobs and see if you can get a sound you like better. Always remember that sound design is a matter of taste.


Wanna contribute a cool tip?
email me : fireballgames AT hotmail DOT com
Feel like being a good sport?
Add me as a friend on myspace!
Cheers
J

Sunday, June 14, 2009

Arpeggiator Fun - Part I

I remember the first time someone showed me an arpeggiator on his synth. I thought it was pretty dumb. Why would I want something like that? I can program it myself or even play it myself.
Well, all that is true, but still, there are many things that are just too complicated to program which you can easily do with an arpeggiator. There are also many randomizable events that are just impossible to program. In this post I'll show cool things that can be programmed but are easier to do with an arpeggiator. This post assumes you have a decent knowledge of envelopes in live.

Lets get started!
  • We'll start by opening Live in session view , dragging our favorite SW synth into that channel (I chose operator) and creating a simple 1 bar loop:


  • Next we'll drag an arpeggiator into the device list (right before the SW SYNTH):


  • Now let's start playing with the different parameters ( I won't go into them all):
  1. Rate - this is the frequency of the notes played for each note fed into the arpeggiator. play around with it a bit and then bring it back to 1/16th which means every note played will be divided into 1/16th note repetitions.
  2. Gate - the length of the note being played. 100% means that notes will play their full length as set in the rate parameter, in our example, full 16th notes. Setting the gate to 50% will make the notes shorter , in our example, each 16th a short 32th note will be played giving a staccato feel. If set to more than 100% notes will overlap giving a legato feel. very useful for gliding (portamento) sounds.
  3. Steps - the amount of arpeggiator steps to be executed. With steps set to zero we just have a note repeater, play around a bit and see what happens. Each new note re triggers the arp, so having more than 4 steps will have no effect in our specific example (4 16th notes for each 1/4th note played into the arp).
  4. Distance - The interval (in semi-tones) of each step set above. If set to +12, for instance, each step in our arp will jump up and octave.
  5. Style - since we only programmed one note at a time in our midi clip, most of the styles will sound exactly the same, but random will have a nice effect on this one as well. Once you've had your fun , bring it back to UP.
  • Now let's set up automation for the first 4 parameters:
  • Make a 4 bar looping envelope which plays 3 bars of 1/16th notes, Half a bar of 1/8th notes a quarter of a bar of 1/32th notes and a quarter of a bar of 1/8th notes. Start off by setting the knob manually to 1/32th notes,and in the envelope make 1/16th notes +2 and 1/8th notes +4. starting to sound cool already huh?


  • Make a 3 bar looping with a simple up and down pattern for the gate parameter. manually set the knob to 135% (this will define the peak of the envelope):


  • set the steps knob to zero manually. then build a 5 bar envelope setting the value at +4. In draw mode set each 1st quarter to a different value:


  • set the distance knob to zero manually. Then build a 1.5 bar loop with a +7 and +10 distance somewhere in the middle :


With 5 minutes, a bit of tweaking and minimal imagination, we took a really dumb loop and made a cool (almost) random feeling loop out of it. Try changing the simple operator patch into something cooler or better yet, add more automation to the SW synth and see how far you can take it!


Wanna contribute a cool tip?
email me : fireballgames AT hotmail DOT com
Feel like being a good sport?
Add me as a friend on myspace!
Cheers
J
Reblog this post [with Zemanta]